Oral Language Teaching Projects and Resources

September 17th, 2007

This is an example of a two week oral language programme for Intermediate-aged children. It was based on an integrated literacy approach around the theme of the book of ‘The Burnt Stick’.

Week One

Strand: Oral Language –Listening

Level: 4 (Year 7/8)

Achievement Objectives: Interpersonal Listening – Students should listen to and interact with others to clarify understanding of narrative, information, ideas and opinions, and to contribute to discussion, in one-to-one, small group and class discussion.

Read Aloud: “The Burnt Stick” by Anthony Hill

Focus – Identity

Links to other curriculum areas: Listening

Links to others strands: Listening, writing, viewing

Approaches:

Teacher-directed

Modeling

Joint construction

Group work

Learning Activities

Lesson One

The class has a discussion – “what makes a good film?” e.g. good sound/visual effects, humor. Children discuss as a class the features of a film that makes it exciting to watch.

Children watch the film named “A Snail’s Pace” and brainstorm in small groups all the features they observed that helped convey e.g. high/low camera angles, fast blurred background –sharp close up.

Children report back to the class the techniques they observed that they thought helped create meaning.

Introduction of film techniques (visuals) to the class directed by the teacher.

Lesson Two

The children fold up a piece of A3 paper so there are eight equal boxes and explain to the children that this will be a storyboard

Review the short film – in small groups the children will do a quick sketch of eight significant parts of the film and write what made it effective. Review techniques from Lesson One. More play than one if necessary.

As a class, discuss and talk each group put in each of their eight boxes. “What were the most effective? What sort of mood did this create?”

Skills:

Interpersonal Listening – listen to and interact with others as a whole group, small group and one-to-one.

Co-operating in small groups.

Reporting back to the class using effective oral skills e.g. slow pace, clarity, tone.

Organising material effectively and supporting each other.

Processing information as a group and selecting relevant points to share to the class.

Processes:

Children working in small groups on a given activity.

Children given specific group roles to ensure everyone is actively participating and co-operating e.g. recorder, reporter, encourager, time manager, material collector.

Allowing each member to report back at least one point from the ideas gathered to encourage children to use their oral skills in front of an audience.

Introduction of specific film terms, (e.g. setting, plot, sound effects, cinematography) as a form of modeling – children are given examples from the teacher (a brief term such as ‘introduction’) that they can extend from.

The children are given the opportunity to work as a group, and to collaborate knowledge and ideas orally and to recall back these ideas as a group/individually

  • Teacher records ideas onto whiteboard.
  • Teacher introduces the features of them film such as colour/mood, music/sound effects, symbols, setting and characterization etc.
  • Ideas are put into sub-categories on the board, e.g. sound =noisy traffic, fast cars, lettuce crunch

The teacher and students create this by a joint construction

Learning Intention: The children will become familiar with various film techniques to prepare for the film study of “The Rabbit-proof Fence”

Specific Objective: The children will be encouraged to talk coherently in small groups about their previous knowledge, ideas of film and to share this knowledge through speaking as a whole group.

Week Two

Strand: Oral Language –Listening

Level: 4 (Year 7/8)

Achievement Objectives: Interpersonal Listening – Students should listen to and interact with others to clarify understanding of narrative, information, ideas and opinions, and to contribute to discussion, in one-to-one, small group and class discussion.

Read Aloud: “The Burnt Stick” by Anthony Hill

Focus: Identity

Links to other curriculum areas: Listening

Links to others strands: Listening, writing, viewing

Approaches:

  • Small group discussion
  • Whole class discussion
  • Teacher directed

Lesson Three

Recap from lesson one + two

Class discussion on how visual techniques are visual techniques can determine whether a film is well excellent/poor e.g. boring sound effects, not good use of lighting

Class discussion on “what is a film review?” e.g. people who review a film for a profession before the movie is previewed

Analysis of a film in small groups “The Rabbit-proof Fence”

Discuss the similarities between the novels “The Burnt Stick” and “The Rabbit-proof Fence”.
Example of a Written Language Unit

September 17th, 2007

Myths and Legends

Level:

Four (Year 7/8)

Achievement Objective:

Poetic Writing – Write on a variety of topics, shaping, editing, and reworking texts in a range of genres, and using vocabulary and conventions, such as spelling and sentence structure, appropriate to the genre.

Links to other curriculum areas

  • Social studies
  • Culture studies
  • Maori

Teaching Approaches

  • Scaffolding
  • Teacher directed
  • Modeling

Skills:

  • Work collaboratively in pairs to construct a brainstorm of ideas
  • Identify language features
  • Identify different sorts of characters
  • The children will use the writing process
  • The children will assess another child’s work

Processes:

  • Discuss features of a narrative (myth) on whiteboard
  • Discuss criteria and expectations
  • Brainstorm ideas for a myth in pairs
  • The teacher will write children’s ideas on a poster that will be displayed
  • The children will brainstorm their ideas for their own myth before writing
  • The children will use the writing process
  • The children will assess another child’s work according to a previously discussed criteria

Learning Activities:

Lesson One

Model/discuss with class the features of a narrative e.g. introduction, setting. Brainstorm this on the whiteboard.

Explain purpose to write an individual myth is so that at the end the teacher can bind them to make a book of myths.

In pairs the children will brainstorm ideas for their own creation myth –focus on characters e.g. misleading character, trickster character, and misunderstood character.

In their pairs, the students will report ideas back to the class to create a display chart of the different sorts of ideas for ideas/features of a narrative (the children will always be able to view this poster throughout the week).

Lesson Two

Share criteria of the myth –e.g. “has my myth got characters that play a set part?”

Individually the students will brainstorm their ideas for their own myth to write about in their book. Explain purpose – a guide for writing. The teacher will sign this off before the children start writing

Review writing process – draft, rework, proofread, teacher conference, revise and publish

Lesson Three/Four

Students work at their own pace, using the writing process – draft, rework, proofread, teacher conference, revise (peer), publish

If no children are up to having a teacher conference, the teacher will continuously roam to give individual feedback on children’s work.

Repeat lesson four until the children have published their work. Children can finish publishing in their own time if needed. At the end of the lesson, the whole class will have a sharing time. The children will assess another child’s work according to the criteria.

The Benefits of Project Based Learning

September 17th, 2007
  • Allows for a variety of learning styles and is “real" world oriented
  • Risk-free environment – provides positive feedback and allow choice
  • Use of higher order thinking skills and learning concepts as well as basic facts
  • Utilizes hands-on approaches
  • Provides for in-depth understanding
  • Utilizes various modes of communication
  • Students are responsible for their own learning
  • Students have ownership of their learning. Projects promote meaningful learning, connecting new learning to students’ past experiences
  • Learning utilizes real time data – investigating data and drawing conclusions
  • The learning process is valued as well as the learning project
  • Learning integrates with different curricular areas
  • Teacher is a facilitator of learning
  • Student self-assessment of learning is encouraged

The Barriers of Project Based Learning

There are many reasons why teachers have not ‘embraced’ technology enhanced project based learning to is full potential including lack of preparation time, limited resources, lack of administrative support, and limited class time to implement PBL in the curriculum. Other reasons are tha teachers may have difficulty adjusting to a more guiding role or facilitator, and helping students to become more self-directed. These external and internal barriers have different characteristics.

  • External barriers include a lack of access to things such as computers, software, planning time, workload, or administrative support, curriculum coverage
  • Internal barriers relate to teacher beliefs about instructional technology, traditional methodologies, and willingness to make changes in classroom practices, professional development

External barriers are more easily recognised and readily fixed, while internal barriers require changes in teachers’ beliefs and daily teaching method.

The Definition of Project Based Learning in Schools

September 17th, 2007

Project-based learning (PBL) is a model for classroom activity that shifts away from the classroom practices of short, isolated, teacher-centered lessons and instead emphasizes learning activities that are long-term, interdisciplinary, student-centered, and integrated with real world issues and practices.

One immediate benefit of practicing PBL is the unique way that it can motivate students by engaging them in their own learning. PBL provides opportunities for students to pursue their own interests and questions and make decisions about how they will find answers and solve problems.

PBL also provides opportunities for interdisciplinary learning. Students apply and integrate the content of different subject areas at authentic moments in the production process, instead of in isolation or in an artificial setting.

PBL helps make learning relevant and useful to students by establishing connections to life outside the classroom, addressing real world concerns, and developing real world skills. Many of the skills learned through PBL are those desired by today’s employer, including the ability to work well with others, make thoughtful decisions, take initiative, and solve complex problems.

In the classroom, PBL provides many unique opportunities for teachers to build relationships with students. Teachers may fill the varied roles of coach, facilitator, and co-learner. Finished products, plans, drafts, and prototypes all make excellent "conversation pieces" around which teachers and students can discuss the learning that is taking place.

In the school and beyond, PBL also provides opportunities for teachers to build relationships with each other and with those in the larger community. Student work-which includes documentation of the learning process as well as the students’ final projects-can be shared with other teachers, parents, mentors, and the business community who all have a stake in the students’ education.

Gawith’s Action Research Model

September 17th, 2007

Information literacy is partly about finding out information, partly about the need for accuracy and precision, but all about interpretation. There are a few different information literacy models that teachers could integrate into their classroom programme. For a range of these see http://ictnz.com/infolitmodels.htm.

The stages of research (Gawith, 1991) are all linked. Students will move back and forth between the different stages as they find new information and modify their research questions.

The Six Stages of the Action Research Model are: deciding, finding, using, recording, presenting, and evaluating

Stage 1: Deciding

There are a number things to consider prior to the students taking part in the research:

  1. Determine what they need to know to do the research. Is the research task achievable? Do they understand they topic? How long have they got to complete it? How will they present their information?
  2. Determine what they already know. Brainstorm what they already know, then sort what they know into categories and map it using a concept map.
  3. Highlight key words from their map that will help them in their search for information.
  4. Decide what they need to find out. List key questions they need to ask.

During this, teachers need to provide support to the students by:

  • modelling and discussion,
  • negotiating achieving research tasks
  • providing guidelines about process, product and assessment criteria, for example, a rubric
  • providing of examples of finished products and marking them as a class according to assessment (similar to an exemplar)

Stage 2: Finding

Students need to determine where to find the information they will need.

They could include:

  • people in the school and community
  • organisations
  • school and public libraries
  • print resources, including books, encyclopedias, magazines, pamphlets and newspapers
  • electronic resources, including the internet, TV, radio and video
  • maps, posters and charts, atlases

Teachers should provide support through:

  • working with the librarian or library aide to identify and collect resources
  • help students see that the library is but one source of information available to them
  • demonstrate how to use resources e.g. contents, indexes
  • provide time for students to become familiar with resources
  • where possible, enable students to have their own copy of a resource
  • give students the opportunity to review their research questions

Stage 3: Using

At this stage, students should focusing on their focus questions. They should scan to get a feel of the whole text and skim by zooming through the text quickly to spot key words from their brainstorms and mind maps.

Teachers should provide support to the students by:

  • demonstrate how to read a non-fiction text
  • sharing their feelings and problems with research reading
  • demonstrating the skills of scanning and skimming
  • Taking mini lessons on how to take notes

These sorts of skills can be integrated with the reading programme in the classroom.

Stage 4: Recording

At this stage, students should focus on what is most important and organise their information with presentation in mind. They should read through all the information before making notes in point form. They should use their focus questions and key words to help focus their notes and record only what they need to know.

Teachers should provide support through:

  • using collaborative talk to help students clarify points and meaning
  • helping students select information from their notes
  • suggest ways of ordering information
  • teaching the skills of categorising, sequencing and drafting

Stage 5: Presenting

When presenting information (in this unit it will be in the form of a rubric), the children should remember some important things:

  1. Who is the audience the presentation for?
  2. What do I want to say?
  3. How am I going to communicate it?

Students need to think about how to present their information in ways suitable to context, purpose, topic and audience. They will need to the process of drafting and re-drafting their work, seeking the advice of the teacher and their peers while doing this.

Teachers should provide their support by:

  • modelling different forms of presentation
  • modelling the drafting and re-drafting of information for presentation
  • using previous students’ work and real life examples  just like an exemplar
  • discussing a range of presentation possibilities: booklets, posters, PowerPoint presentations, Front Page, diaries, pamphlets, instructions, essays, newspaper reports, charts, diagrams, debates, advertisements, drama, etc.
  • inviting a range of people to act as an audience and encouraging the children to be a good audience

Stage 6: Evaluating

Students should reflect on their learning and performance as a researcher throughout the research process. At the end, they should evaluate what they did well and what not so well and establish skills for their next learning step. The children should also think about what they would do if they were to take their research even further.

The teacher should provide support by:

  • provide guidelines for teacher assessment, form examples, sharing a rubric or analysing exemplars
  • providing guidelines for peer assessment
  • provide guidelines for self assessment

Bloom’s Taxonomy

September 17th, 2007

Benjamin Bloom led a group of educational psychologists who developed a classification of levels of intellectual behaviour that are important in learning.

Bloom identified six levels within the cognitive domain, ranging from the lowest level, simple recall, through to increasingly more complex and abstract mental levels, to the highest order which is classified as evaluation.

Evaluation

Assess, decide, rank, grade, test, measure, recommend, convince, select, judge, explain, discriminate, support, conclude, compare, summarize

Synthesis

Combine, integrate, modify, rearrange, substitute, plan, create, design, invent, what if?, compose, formulate, prepare, generalize, rewrite

Analysis

Analyze, separate, order, explain, connect, classify, arrange, divide, compare, select, explain, infer Application Apply, demonstrate, calculate, complete, illustrate, show, solve, examine, modify, relate, change, classify, experiment, discover

Comprehension

Summarize, describe, interpret, contrast, predict, associate, distinguish, estimate, differentiate, discuss, extend

Knowledge

List, define, tell, describe, identify, show, label, collect, examine, tabulate, quote, name, who, when, where, etc.

Etching with Crayon

September 17th, 2007

Coming Soon

Art Unit – Kowhaiwhai Patterns

September 17th, 2007

Achievement Objectives

D1: Developing ideas in the Visual Arts – Students will generate and develop visual ideas in response to a variety of motivations, using imagination, observation, and intention with materials.

C1: Communicating and Interpreting in the Visual Arts – Students will describe how selected objects and images communicate different kinds of ideas

Learning Intentions/Specific Learning Objectives

  • Students will recognize kowhaiwhai patterns and appreciate that they have meaning outside of their visual characteristics.
  • Students will understand, name and recreate some of the shapes used In kowhaiwhai.
  • Students will combine oil pastels to create value and depth.

Success Criteria

  • The students will use their knowledge and skill to produce kowhaiwhai patterns of their family.
  • The children will anecdote the ideas of their kowhaiwhai patterns on their draft copy.
  • The children will demonstrate the use of kowhaiwhai art in their family portrait.
  • The children’s kowhaiwhai patterns will keep in tradition e.g. bulb head of koiri will not touch the stem.
  • The children use different colours to represent different ideas e.g. red/orange = warm.
  • The student will use a contrasting colour scheme.

Assessment Methods

  • Observation of class room discussion
  • Work sample analysed using criteria

Lesson One

Introduction:

Show the children different kowhaiwhai patterns.

Ask the children to name examples of places they have seen them before e.g. marae, kapahaka costumes

Development:

Introduce a kowhaiwhai pattern. Practice pronunciating the vocabularly (koru, koiri, mangopare, patiki, puhoro, rauru, marama).

Point out the visual features of the pattern out e.g. koru ends in a round bulb. Draw the pattern on the whiteboard, commentate the steps like handwriting.

The children then have lots of practice drawing it in their bad pads. Repeat with the different patterns

Closure:

Review the different patterns. Discuss similarities/differences.

Lesson Two

Introduction:

Review the kowhaiwhai patterns (visual characteristics/ideas).

Brainstorm what could be in a family portrait e.g. Show the chn an example and ask the children if they can add the brainstorm.

Development:

Ask how the chn can portray a family member using pattern and colour. The children start a draft. They must include on it the ideas and the colours being used. They must be able to give reason for certain patterns and colour. Show children exemplar. Discuess using colour to achieve an effect e.g. warm/cold colours

Closure:

Show a good standard of students work to the class. Share the similarities with the exemplar. Outline the next lesson.

Lesson Three

Introduction:

Show a student’s piece of work that is ready to start a good copy – have the children analyse their own work to see if it is up to the standard of publishing.

Development:

The class work independently on their kowhaiwhai family portrait.

Roam the class and question each child on their ideas/features of their portrait.

Closure:

The children will have time at the end of the lesson to share their kowhaiwhai portraits to the class. Teacher marks to the criteria discussed in previous lessons


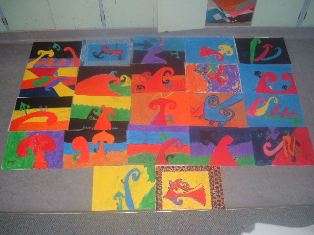
Above are most of the class’s kowhaiwhai unit all published.

Art Teaching Projects and Resources

September 17th, 2007

Art Unit – Kowhaiwhai Patterns
(Click here to see an example)

Etching with Crayon

Drama Teaching Games and Resources

September 17th, 2007

Before you start teaching drama activities it is essential to set your expectations to help the students enjoy their experiences and to make things run smoothly – especially if it is new to them! Here are some guidelines to share with the children.

  1. Establish the boundaries where the drama will take place, for example if you are teaching drama in a classroom establish that the children do not go behind the teacher’s desk etc. If using the school hall/gym, mark out a certain space such as half or a third of the hall. Make sure that the children do not cross these boundaries.
  2. Establish a stop signal for example a bell or a whistle. When the children hear this signal they will ‘freeze frame’.
  3. Insist on a ‘no talking rule’ unless you have instructed the children to do so. Encourage the children to be serious and that you expect quiet concentration. "Drama is not a noisy time, in fact it’s quieter than maths!"
  4. If the children are moving around in the space, state a direction of movement, for example clockwise.
  5. Establish a no touching rule unless the drama activities requires touching.

Below are some fun drama activities.